Permissions
The entry point for permissions is shown below:
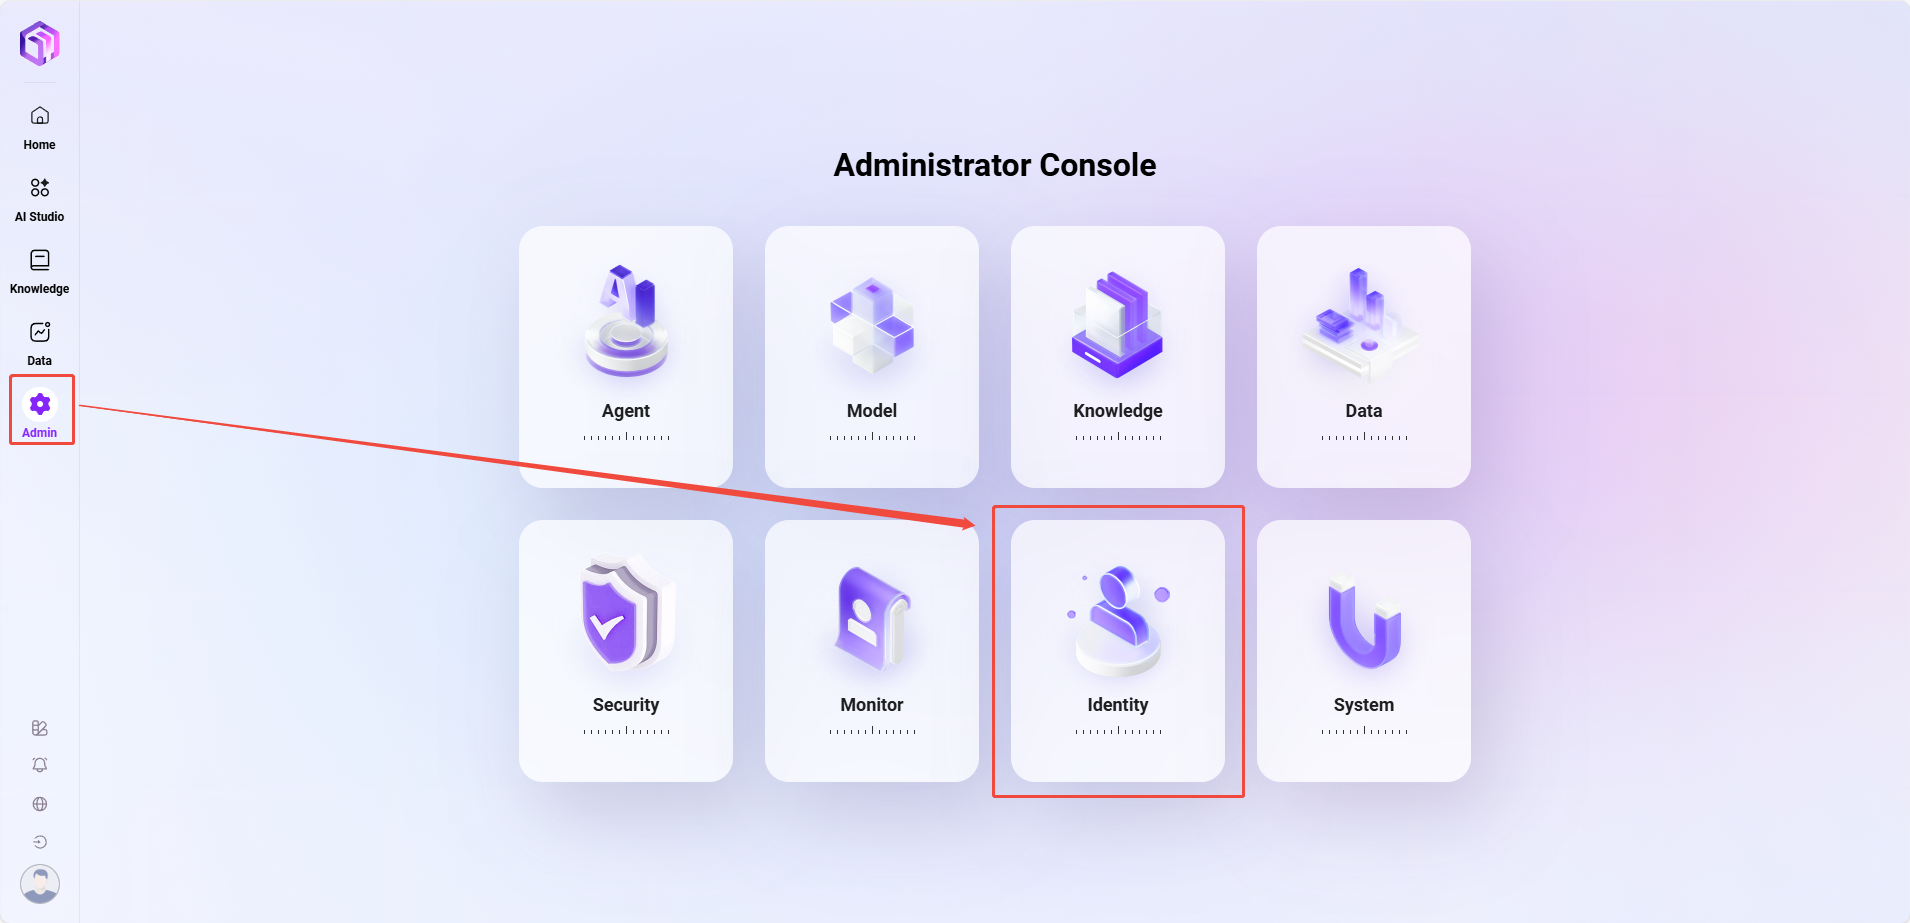
Personnel Management
How to Add a New User?
The specific steps to add a new user are as follows:
- Go to Management > Permissions > Personnel Management page.
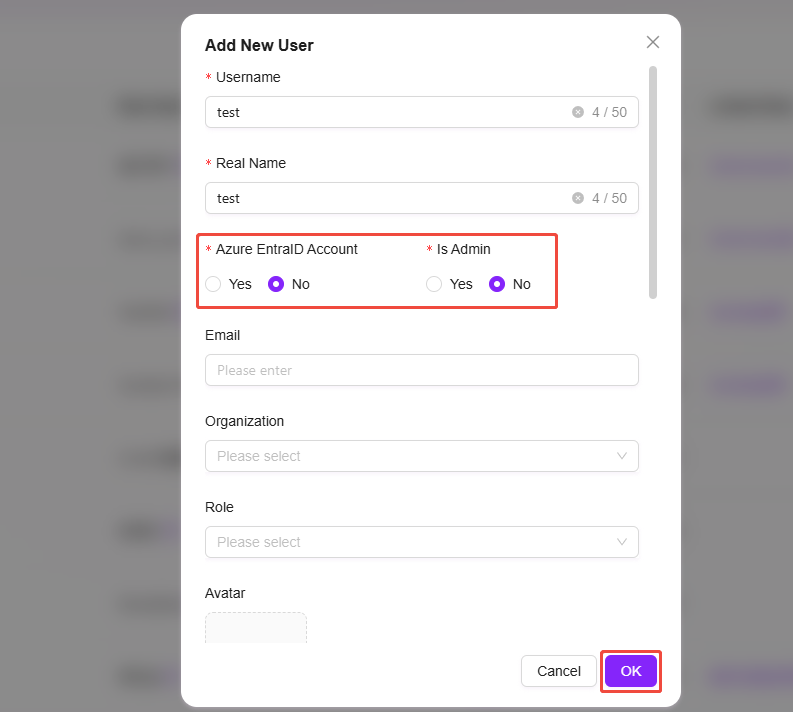
- Click the Add User button on the right to enter the Add User page.
- Fill in the user information:
- Username: Enter the username of the new user.
- Real Name: Enter the real name of the user.
- Is Azure Entra ID Account: Select whether it is an Azure Entra ID account.
- Is Administrator: Choose whether to set this user as an administrator.
- Other information (such as email, organization, role, etc.) is optional and can be filled in as needed.
- After completing the information, click the Confirm button to create the new user.
💡 Tip: If the new user is selected as Azure Entra ID, the email is required

How to Change User Password?
Currently, the system does not support administrators directly changing user passwords; only password reset is supported. The reset password is randomly generated and can only be viewed once.
- Navigate to Management > Permissions > Personnel Management page.
- Find the user whose password needs to be reset, click the three dots behind the user, and select Reset Password.
- In the pop-up confirmation dialog, click Confirm, and the system will generate a random new password.
- Copy the new password and provide it to the user to complete the password reset operation.
💡 Tips:
- After the password reset, the user needs to change the password on the first login, which achieves the purpose of password modification.
- The password must be at least 10 characters and contain uppercase and lowercase letters + numbers + special symbols.


Organization Management
Administrators can manage organizations in the system, including creating, editing, and deleting organizations, and associating users with organizations. Organization management helps efficiently manage various internal teams and external partners within the enterprise.
View Organization List
- Enter the Organization Management page: Select "Organization Management" in system settings to enter this page.
- View created organizations: The system displays all existing organization information, including organization name, associated roles, and whether it is an external organization.
- Each organization has an "Edit" button on the right, allowing administrators to modify the organization or click the "Delete" button to remove it.
How to Create a New Organization?
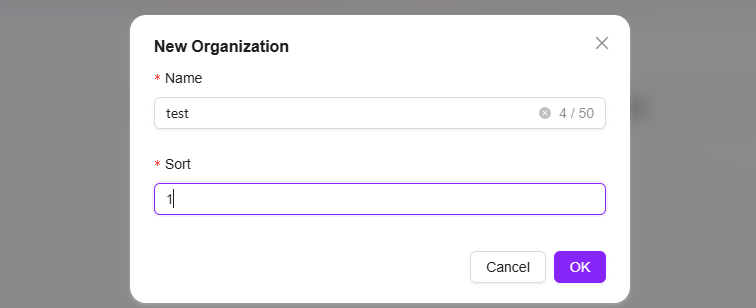
- Click the "New" button: On the organization management page, click the "New" button on the right to start creating a new organization.
- Fill in organization information:
- Organization Name: Assign a unique name to the organization.
- Sort Order: Specify a sort number for the organization for easier management.
- Click "Confirm": After filling in all necessary information, click the "Confirm" button to successfully create the new organization.
💡 Tip: It is recommended that the organization hierarchy does not exceed 7 levels.

How to Edit an Organization?
- Select the organization to edit: Choose the organization to be edited from the organization list.
- Click the "Edit" button: Enter the edit page; the editing content is the same as when creating a new organization. Administrators can modify the organization's name, sort order, and other information.
- Save changes: After editing, click the "Save" button to update the organization information.

How to Delete an Organization?
- Select the organization to delete: Choose the organization to be deleted from the organization list.
- Click the "Delete" button: After secondary confirmation, the organization can be deleted.

Associate Users
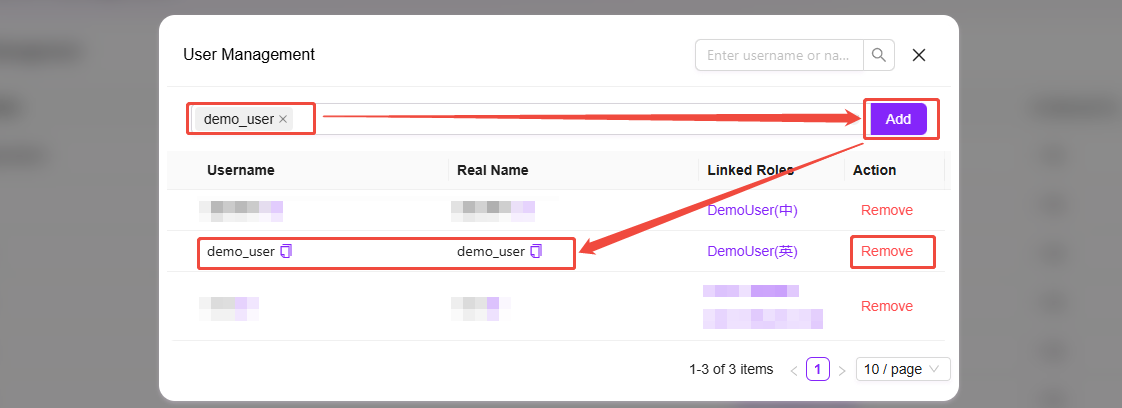
The specific steps to add or remove associated users are as follows:
- Click "Associate Users": On the organization management page, select the organization to associate users with, and click the "Associate Users" button on the right.
- View associated users: On the associate users page, administrators can see all users already associated with the organization.
- Remove associated users: Administrators can select associated users and click the remove button to remove them from the organization.
- Add associated users: Select users to add from the dropdown and click the "Add" button to associate new users with the organization.

Role Permissions
How to Create a Role Group?
In role permission management, administrators can create new role groups. After creating a role group, administrators can create new roles within the group and assign permissions.
- Navigate to Management > Permissions > Role Permissions page.
- Click the + button above the role group list on the left to create a new role group.
- In the pop-up window, enter the name and sort order of the role group.
- Click Confirm to complete the creation of the role group.


How to Add a New Role?
- Navigate to Management > Permissions > Role Permissions page.
- Select the role group where the new role will be created.
- On the role group page, click the Add button on the right side of the role list.
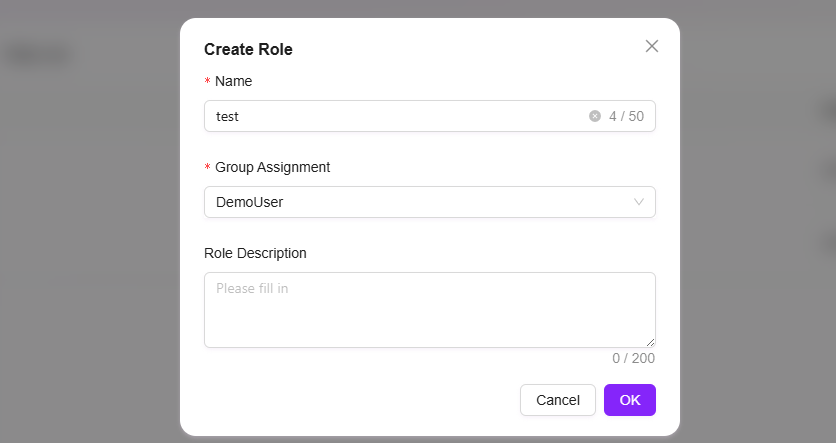
- Enter the new role's name, select the group it belongs to, and fill in the role description.
- Click Confirm to complete the creation of the new role.

How to Assign Functional Permissions to a Role?
Assigning functional permissions to a role means specifying what functions the role has.
The steps to assign functional permissions to a role are as follows:
- Navigate to Management > Permissions > Role Permissions page.
- Select the role to assign permissions to.
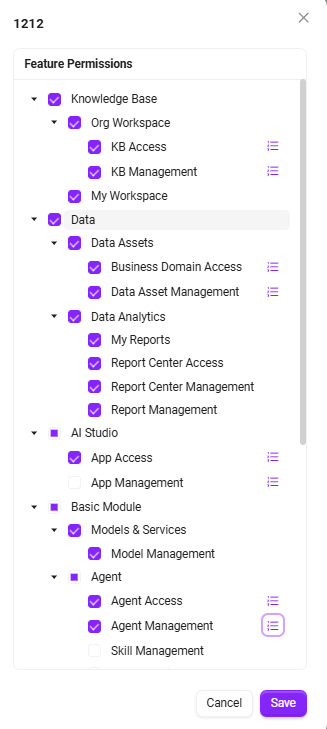
- Click the Function Authorization button behind the role to enter the function authorization page.
- On the authorization page, you can assign the following functions to the role:
- Model Management
- Model Channel Management
- Application Market
- Basic Modules
- Data Analysis
- Knowledge Base
- Content Security Management
- After selecting the required functions, click Confirm to complete the role's function authorization.

How to Assign Users to a Role?
Assigning users to a role means allocating a specific role to users.
The steps to assign users to a role are as follows:
- Navigate to Management > Permissions > Role Permissions page.
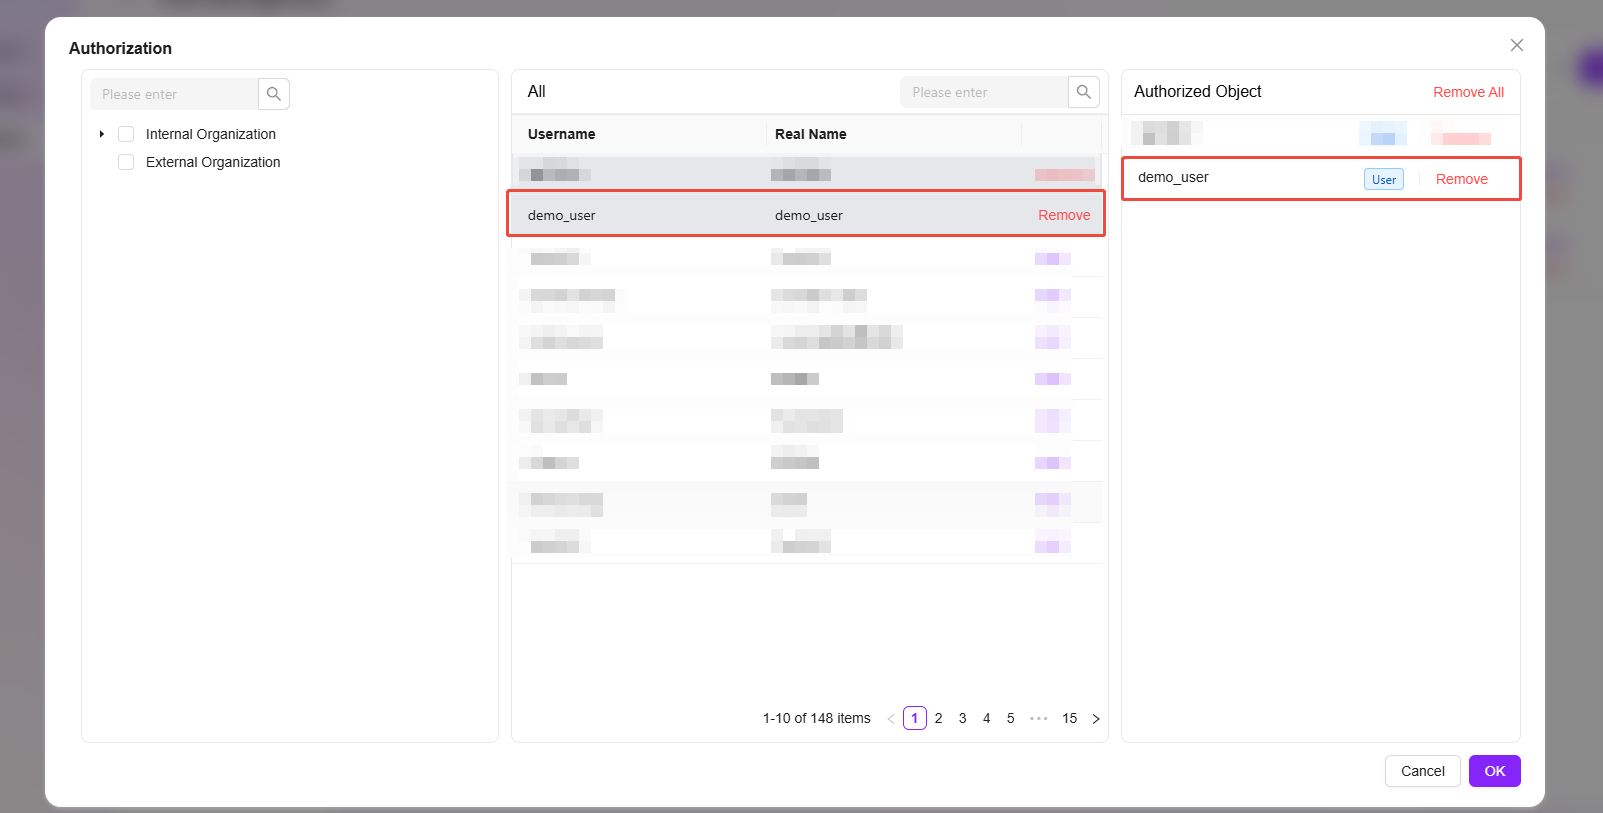
- Find the role to assign users to, and click the User Authorization button behind the role to enter the user authorization page.
- On the user authorization page, find and check the users to authorize according to their organization.
- Successfully selected users will appear in the authorized objects column.
- After selection, click Confirm to complete the user authorization for the role.

Token Management
Token management is an important new feature module added this time, aiming to optimize the original API Key generation and usage method. The new version upgrades the previously scattered, resource-bound API Key mechanism to a centralized access token management system based on user permissions, achieving higher security and controllability.
In the new system, Access Tokens are strongly associated with user permissions. Each token's access scope, validity period, and management permissions are uniformly controlled by the system to ensure the security and controllability of system resources.
Access Token Supported Scope
Currently, Access Tokens can be used for the following API interfaces:
- Agent Configuration Query OpenAPI — Supports secure access to Agent-related configurations via tokens.
- FAQ List OpenAPI — Supports external systems securely obtaining FAQ data.
- All MCP Server interfaces published by Agent — Ensures that external service access by Agent is controlled by the token system.
Token Management Interface Description
On the "Token Management" page, the system displays all created access tokens in a table format, including the following information:
- Token Name: Administrator-defined token identifier used to distinguish tokens for different purposes.
- Managing User: The user bound to the token; the token's access permissions inherit from this user.
- Token: The system-generated Access Token string.
- Status: Includes Enabled, Disabled, and Expired states, clearly reflecting the token's current availability.
- Usage Count: Counts how many times the token has been called, helping administrators monitor usage frequency.
- Last Used Time: Shows the most recent time the token was used.
- Validity Period: Displays the token's valid duration (e.g., 7 days, 30 days, 90 days, or permanent).
- Creation Time: Records the time the token was generated.
- Actions: Provides a "Regenerate" button to update the token value for security.

Generate New Token
- Click the "Generate New Token" button at the top right of the page.
- In the pop-up window, fill in the following information:
- Token Name: Enter a meaningful name for the token for easy identification of its purpose.
- Inherit User Permissions: Select the system user whose permissions the token will inherit, automatically granting the token the user's access scope.
- Validity Period: Choose from 7 days, 30 days, 90 days, or permanent.
- Click the "Generate" button to create a new Access Token.
The generated token will immediately appear in the list. Administrators can copy the token for subsequent API access.


Token Usage Instructions
The generated Access Token can be used to call controlled API interfaces (such as Agent, FAQ, MCP Server, etc.). When using, the token must be added as an authentication credential in the request header, for example:
Authorization: Bearer <Access Token>
Through this method, the system can verify the identity of the visitor and check permissions, ensuring secure and compliant interface access.